More than the average, people tend to leave any site that takes a lot longer to load than the quicker one, about 53% if you had to give it a number. Additionally, it’s been speculated that it only takes less than 2-3 seconds for people to make that decision.
We’re not surprised, and neither are you! We’re certain that in your time spent scouring the web for information or entertainment, you’ve probably pressed the back button mercilessly on websites that slow you down. So isn’t it safe to think that people would do the same if your business site on WordPress is slowing down?
WordPress sites, even though popular, are known for causing website owners the most common issue: slow loading times. Not only does this affect numerous website performance metrics negatively such as bounce rates, leading to poor user experience, but at the same time, your SERP rankings will pummel down due to lack of engagement.
While there are several ways to speed up your business site on WordPress, such as opting for CDN services or optimizing the images on your site, a quick and simple fix is to go for a WordPress cache plugin.
With the right plugin, not only will it increase website speed but you’ll be reaping several benefits that come with it. But first, let’s understand what caching is and why it is crucial for WordPress websites.

What Exactly Is Caching?
In the simplest terms, caching is the process or technique of keeping or storing your website’s most frequently requested data in a non-permanent storage location. This helps reduce the load time and let the requested page arrive faster on the user’s browser.
Take it this way, it’s like keeping a book that you frequently use but instead of taking it out from the bookshelf each time, you now have it on your desk for quicker access. Similarly, the process of caching stores the frequently used data on the server or computer, making user’s future visits faster.
In addition, when you start caching your site, the server you use, utilizes fewer resources to load the page, ultimately reducing TTFB (time to first byte) and improving the overall performance of the site.
Why Is Caching Important?
You might already have an idea why caching is crucial for your WordPress website but if you don’t, apart from several, here are the two main reasons why you should focus on it.
Faster Loading
We’ve both agreed that slow loading is extremely exhausting and no one likes to wait around for a web page to load when they have tons of other websites that provide what they’re looking for and with faster loading times. If you’ve ever asked yourself “How to improve website speed?” well, caching is your answer.
Caching simply reduces server response and load times resulting in faster and more responsive websites, ultimately leading to better user experience, and lowering bounce rates.
Higher SEO Ranking
It’s not just people hating on slow-loading websites but even Google has their distaste for it. Generally, fast-loading websites are hugely prioritized and by implementing caching to improve your load times, your website will certainly rank higher on Google’s SERP, which ultimately will attract more traffic and improve your visibility.
Best Cache Plugin For WordPress
Now that we have a better understanding of why caching is important, let's move on to the plugins that make these possible. Choosing the right one is as crucial as opting for it since without a proper caching plugin, you’ll be facing issues such as compatibility, reduced loading speed, cause increased server load, and errors and crashes.
You’re also at risk of numerous security vulnerabilities with no additional support from the developers. Hence, take your time in choosing a caching plugin and consider criteria such as ease of use, compatibility, immaculate support and updates, and a plugin that offers tons of features.
That said, here is a list of the best cache plugins for WordPress.
WP Rocket
WP Rocket is a powerful leading cache plugin that even WordPress experts recommend for all levels of users be it beginners or tech-savvy, and our top pick for caching your business’s site on WP.
Not only is this plugin uncomplicated with a great user-friendly interface, but it offers tons of features that intensify web performance metrics substantially. Easily use advanced features such as lazy loading videos and images, optimization of Google fonts, elimination or minification of unused CSS, etc. If you’re opting for WP Rocket, you’re not only just a few clicks away from attaining optimal load speed but overall website enhancement.
WP Super Cache
WP Rocket is one of the best cache plugins, but if you don’t have extra dollars to spare, you can opt for WP Super Cache, which is a free plugin offered by Automattic, the company behind WordPress. As such, don’t let the word “free” fool you; WP Super Cache has millions of active users signed up and using it to enhance their site’s performance.
The plugin is known for its 3 caching modes. This includes an Expert, WP-cache, and simple mode with the expert mode being the best solution for most site owners. However, WP Super Cache demands technical knowledge so it might not be best suited for beginners.
WP Fastest Cache
Another one of the highest-rated plugins, WP Fastest Cache with its user-friendly interface offers customers a free version as well as a premium. Advanced features such as the deletion of all cached files or others, enabling browser and full-page caching, cache timeout controls, etc., are offered on both the free and premium versions.
While the premium version offers more such as lazy load, minification of JavaScript files, etc., you can also do certain things on the free version that you can’t on other free plugins, such as combining minified CSS and HTML files which does a great job at making your code cleaner.
The most attractive feature of WP Fastest Cache however would be its interface which is checkbox-based, that allows user to easily configure their caching options with just a simple tick.
What Is WP Rocket And How Does It Work?
There’s simply no other caching plugin that does it better than WP Rocket in the market today. It’s voted as the number one performance and WordPress speed optimization plugin by millions of users and the experts over there at WordPress.
That’s because this caching plugin ensures it’s suited for users of all levels in the technical knowledge sphere, making you spend less time trying to configure by providing easy-to-use setups. Additionally, it transcends beyond just caching and provides users with features that enhance multiple aspects of your website under one roof.
But maybe what sets it apart the most from other caching plugins is that WP Rocket automatically enables all 80% of web performance's finest practices as soon as you install and activate it.
We’ll be delving deeper into the advanced features and benefits that WP Rocket offers, but first, let’s take a look at how this powerful caching plugin essentially works in making your website load faster.
Simply put, WP Rocket works by caching your pages with the creation of static HTML files and serving them directly to visitors without the need to regenerate the requested page again. This action highly improves the loading time of the pages on your site and provides a much smoother, faster browsing experience for customers who visit.
Additionally, WP Rocket allows you to automatically or manually cache any new updates you make on the site, always ensuring optimal speed and performance. Some of the benefits of WP Rocket and its advanced features include:
- Easy Installation: WP Rocket completely eradicates the hectic configuration process that normally comes with cache plugins. In the developer's own words, “It only takes approximately 3 minutes and a few clicks to get you set up and have a faster running website.” WP Rocket is meant for both beginners and tech-savvy audiences, ensuring everyone gets their needs met.
- Automatic Caching: For users who don’t want to manually cache your site, WP Rocket offers the automatic caching option to do it for you, making you use your energy on other important aspects of your WordPress site instead.
- File And Media Optimization: As we’ve mentioned earlier, WP Rocket offers features such as file and media optimization to enhance the overall quality of your site. File optimization has numerous options such as the minification of HTML, JavaScript, and CSS files, along with combining multiple CSS and Java files for faster loading. Additionally, WP Rocket also optimizes images and other media files by making use of lazy loading.
- Preload: This feature preloads cached files making sure that visitors always receive cached files and content, including cached content from the pages they have yet to visit. This exponentially reduces load time.
- CDN Integration: WP Rocket allows you to connect with multiple CDNs (Content Delivery Networks) at the same time. This reduces latency and just overall user experience for visitors from various faraway countries.
- Browser Caching: To avoid having users download the same resources from your site, and offer faster browsing, WP Rocket asks the browsers the visitors use to locally download and store it.
- GZIP Compression: This feature drastically compresses the size of the files on your web pages before sending them to your visitor’s browsers. This helps increase the performance of your website, ultimately leading to better load times and an enhanced, speedy browsing experience.
How To Install And Set Up WP Rocket On WordPress
If you’ve made it here, there’s only one thing left to do, install, activate, and enhance your overall website performance. The best part is, as mentioned, you do not need to be a coding expert to start using WP Rocket.
Additionally, if you don’t know where to start, we’ve prepared a step-by-step guide to take you through the installation process, activation, and configuration of your WP Rocket settings to attain optimal speed, performance, and optimization.
Installation And Activation Of WP Rocket
Step 1: Visit The WP Rocket Official Website
Head on over to the official WP Rocket website and purchase a license. You’ll be treated with three options and depending on the number of websites that you would like to run the plugin on, purchase it.
Step 2: Download
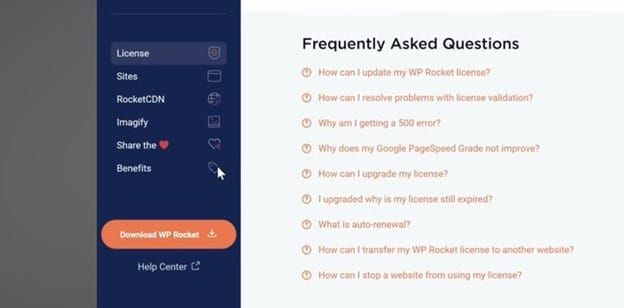
As soon as you purchase the license, you’ll be taken to another page, where you can get the download link. Simply press download to get it started.
Step 3: Login To Your WP Website

Once the plugin is done downloading, log into your WordPress account and head straight to your plugins. Press “Add new” and then “Upload Plugin.” This will upload the plugin we just downloaded. After it’s done, click on “Install Now.”
Step 4: Activate Plugin
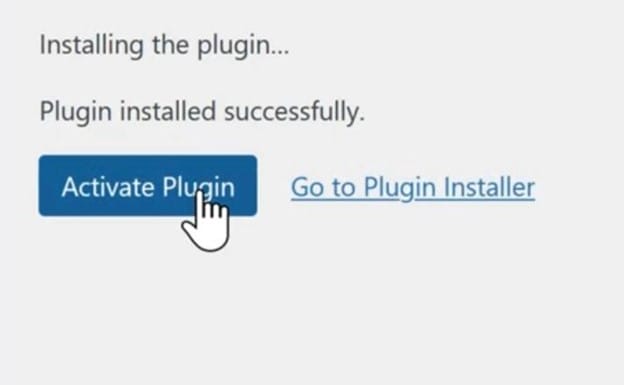
As soon as it’s uploaded, you’ll have the option to activate the plugin. Click on the “Activate Plugin” option and you’re done. WP Rocket automatically configures your website for improved loading time.
Configuring WP Rocket Setting For Optimal Speed Performance And Optimization
Let’s walk you through all the settings that the best cache plugin for WordPress has to offer.
Dashboard
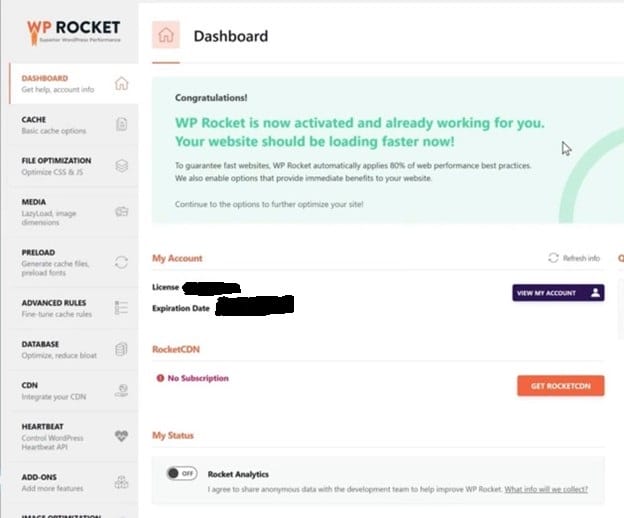
Head on over to the dashboard by pressing the WP Rocket settings. You’ll notice the welcome message on the tab straight away. This page displays all your information related to your subscription and account.
Additionally, you can do certain fast actions such as removing the used CSS cache, clearing OPCasche content, Purging all cached files, and authorizing cache preloading.
Cache

The next setting is the Cache tab! This tab allows you to make basic changes to cache options including:
- The first thing you’ll see is the Mobile Cache. If you’ve ever searched for “How to increase website speed on mobile,” this is it. You’ll need to enable it to speed up the site for active mobile visitors. There’ll be another WordPress mobile optimization plugin option to click on, which is the “separate cache files for mobile devices.” Activate it if you have a dedicated mobile plugin or theme.
- The next thing is the User Cache. Only enable it if you have people logging in to your website.
- The last option is the cache Lifespan. This option allows you to remove older cache files once it expires the period you have given for the plugin to store cache.
File Optimization
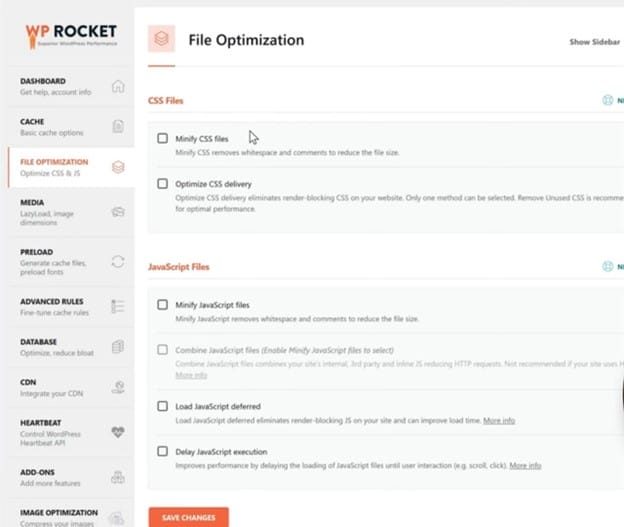
Easily optimize your JavaScript and CSS files on this tab. CSS Files Setting include:
- Minification: deletes comments and whitespaces for you to reduce file space for optimal speed.
- If you have a lot of plugins, enable optimized CSS delivery and take the necessary steps such as removing unused CSS.
- Combine: CSS and JavaScript files will be merged. Enable if you don’t use HTTP/2.
- Save Changes
JavaScript Files Settings Include:
- Activate Minify JavaScript Files for deleting commas and whitespaces.
- Once you’ve pressed enable on activating the minifying option, you’ll get the combine JavaScript files option. Activate it so that the plugin can combine all JavaScript and download it at once.
- The last one is Load JavaScript Deferred. Enabling this option removes all render blocking improving load time.
- Enable the Delay JavaScript execution to delay the files until a user interacts with it.
- Save changes
Media
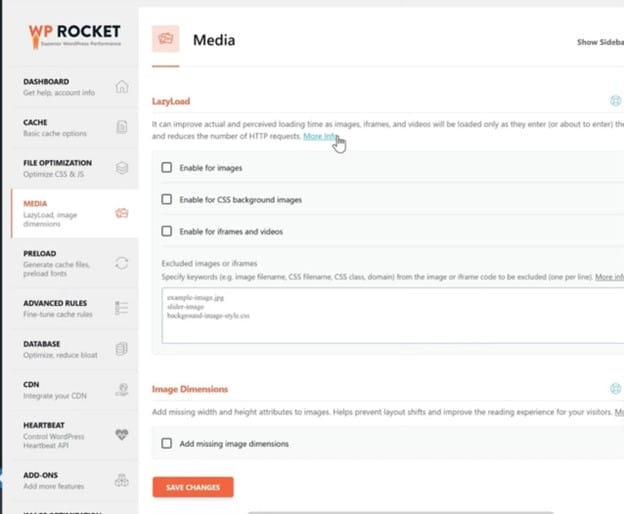
The first one on the list is Lazyload. Enable all three options for increased loading time of your WordPress Site. If you scroll further down, you’ll find the image dimension. If you enable the add missing image dimension, it will eliminate the show of your image getting resized and cropped for visitors.
Preload
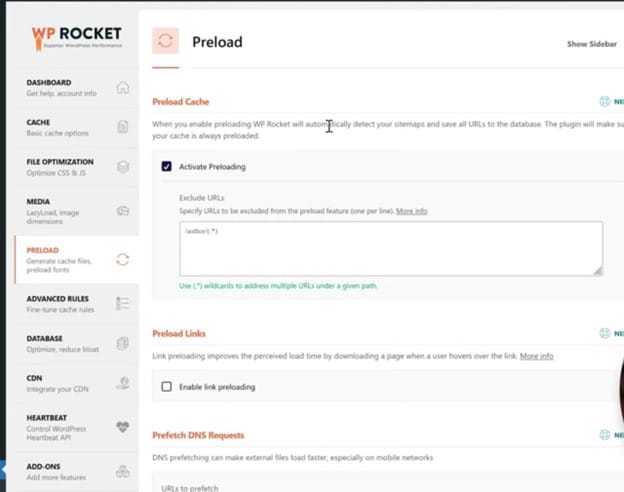
Enable the activate preloading to let the plugin create a cached version for your entire website, always sending your visitor's pre-cached pages for optimal load speed. Other options include:
- Link Preloading: Enabling this option lets the plugin download a link in the background before the visitor clicks on it.
- Prefetch DNS Requests: Enable it if you have DNS that hosts files such as JavaScript files or other data. Add on the column and it’ll be prefetched for a faster website.
- Preload Fonts: If you have your fonts, they preload it before your users visit.
Advanced Rules
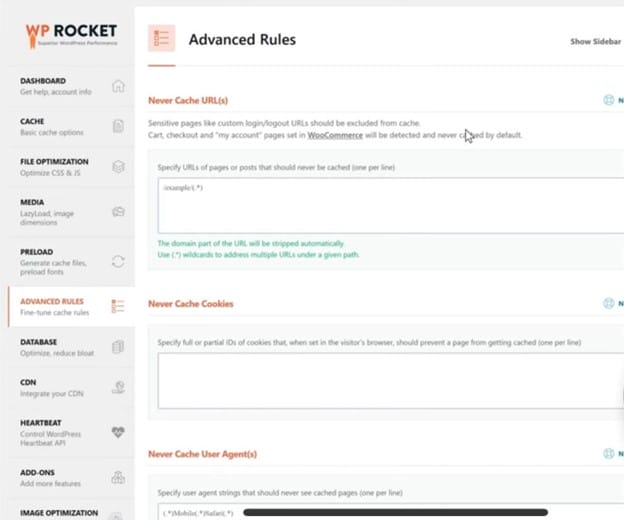
To exclude sensitive pages such as logout/login, they give you the Never cache option in the Advanced Rules tab. There are also never-cache cookies and user agent options. Other options include:
- Always Purge: in times of uploading new posts, you can specify certain URLs to always be purged.
Database
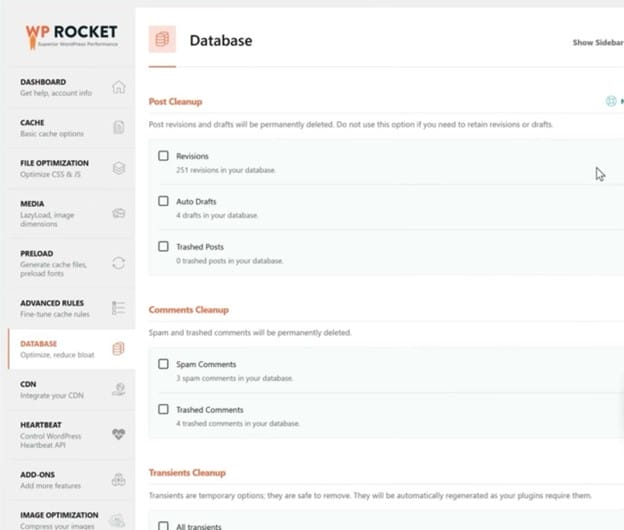
This tab is dedicated to optimizing and reducing bloat. This means this option gets rid of unimportant content by performing cleanup on various levels.
- Post Clean Up: This option includes Trash posts, Auto drafts, and Revisions. Only enable if you don't need any of these options.
- Comments CleanUp: Spam and Trash Comments.
- Transients Cleanup: Automatically deletes up to 16,050 transients in your database.
- Automatic Cleanup: Schedule clean-ups.
CDN
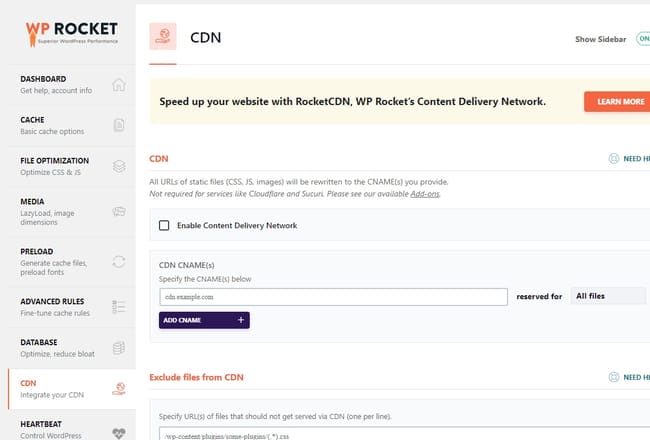
This option is for WordPress websites that have a lot of visitors from faraway countries. The first thing you’ll see is RocketCDN, which is a service provided by WP Rocket, that you can purchase. So if you don’t have a CDN, you can opt for it.
If you already have a CDN, there is an option to enable it.
Heartbeat
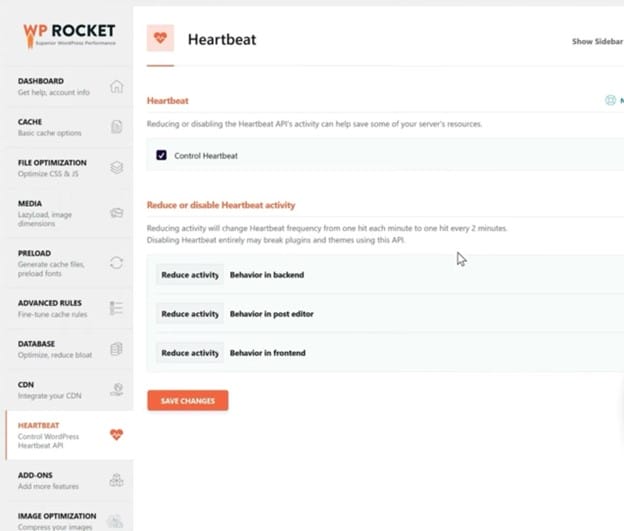
Controlling heartbeat is automatically enabled during activation and you want to keep it that way so that your server has less load.
Add-Ons
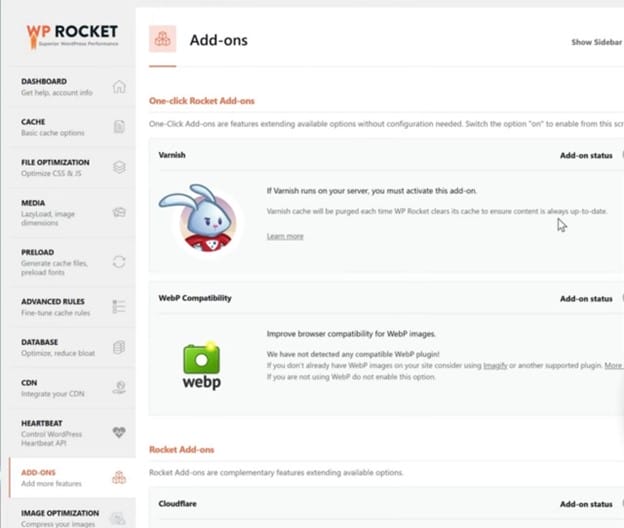
Straight away you’ll see the One-Click Rocket Add-Ons where you will find two options.
- Varnish
- WebP Compatibility
Activate both if you're running them on your server leave if you don’t. Other options include:
- Cloudflare: Enable it if you’re routing your website through Cloudflare. This will integrate it with WP Rocket.
- Sucuri: The same goes for this option.
Image Optimization
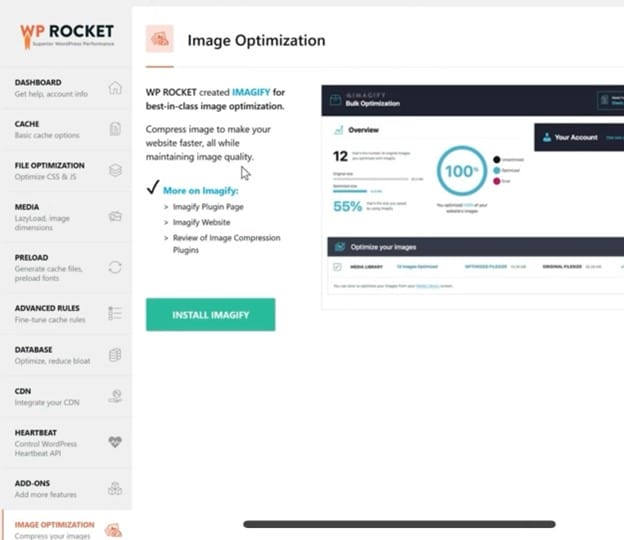
Non-optimized images cause longer load times, so if you think you have bigger images than most, make sure to opt for this option. WP Rocket offers Imagify to compress the said images without the loss of quality, enabling you to easily boost the loading speed of your site.
How To Test And Measure The Impact Of WP Rocket On Your Website
While an extremely slow WP website might show visible optimization without the need for certain tools, for a moderately fast website that needs improvement, you’d need to follow certain steps. Here’s a way you can test and measure the speed, performance, and optimization of your website before and after WP Rocket.
Step 1: True Test
Before opting for the best speed optimization plugin WordPress, WP Rocket plugin, make sure you test your website by using tools such as PageSpeed Insights, GTmetrix, Core Web Vitals, Pingdom, etc. For better results, ensure that you visit at least two to three of these tool’s websites.
Step 2: Tools
The next thing you can do is copy-paste your website's URL into the specified columns of these tool’s websites and analyze your speed.
Step 3: WP Rocket Website
After testing and taking screenshots, head on over to the WP Rocket Website and take the necessary steps to add the plugin to your WP site. Once you’ve taken every step of configuration from our step-by-step guides, use the tools again to test your website’s performance.
Step 4: Necessary Changes
You’ll notice the performance shift immediately. However, if the optimization is not up to your standards, tweak the configurations more to get the best optimized, well-performing website.
Conclusion
WP Rocket is the best WordPress speed optimization plugin in modern times. Not only is it specifically catered to all types of website owners, but it also offers tons of features that you won’t find in many plugins.
While the price may certainly be cheaper, the increased overall performance it offers stands second to none.

Leave a Reply